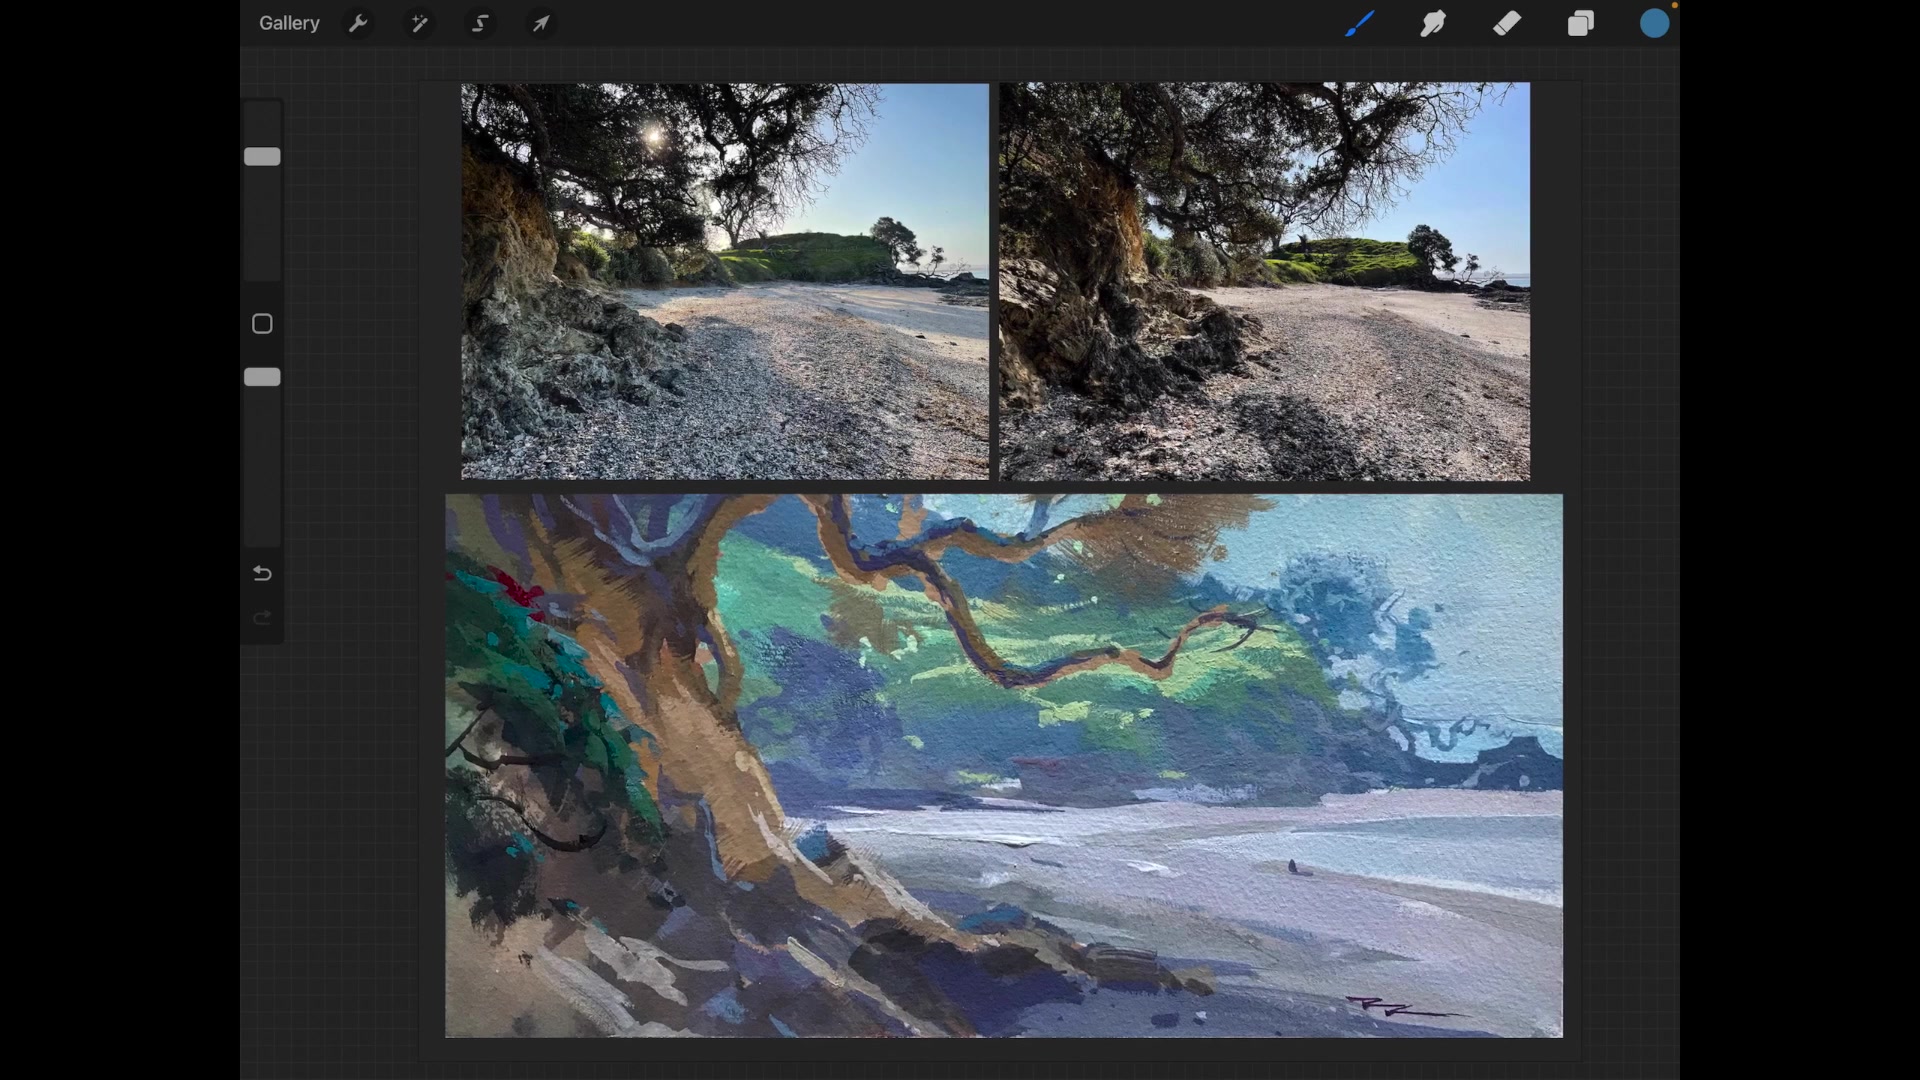
As we embark on this painting journey at Shelly Beach, you'll find yourself immersed in a process that combines the timeless charm of plein air painting with the innovative tools of digital and AI technology. We'll start by capturing the essence of the scene outdoors using gouache on a watercolor pad, a trusty companion I discovered years ago in France. This thick, 100% cotton paper is perfect for outdoor work, as it's pre-stretched and tensioned, ensuring your painting surface remains stable and warp-free. The scene itself offers a rewarding subject, with its interplay of warm light and cool shadows, inviting us to explore a simple yet expressive design. You'll learn to visualize the overall composition, focusing on the warm light filtering through where the tree meets the background hill, and using diagonal lines to draw the viewer's eye into the depth of the painting. This chapter will guide you through each step, from traditional techniques to modern digital enhancements, allowing you to choose which elements to incorporate into your own artistic practice. Let's embrace curiosity and open new doors together, as we paint our way through this beautiful landscape.
This guide accompanies the full video lesson. The lesson includes the complete narrated video, the printable PDF chapter, and personalised critique support.
"Shelly Beach" 12x24" Acrylic on Linen by Richard Robinson
Step 2Photo Reference Analysis
Analyze Photo References
Examine the two photos taken at different times of the day. Notice how the first photo, taken with the sun overhead, lacks long shadows but has strong contrast. The second photo, taken later, shows the sun raking across the landscape, creating interesting blue shadows and enhancing the form of the beach.
Evaluate Lighting and Contrast
Consider how the lighting changes over time. The later light creates more shadow and depth, which can be visually appealing. However, the earlier photo has stronger warmth due to the sunlight bouncing off the rock face, which adds a pleasing contrast to the cooler background.
Decide on Key Elements
Decide which elements to emphasize in your painting. The warmth of the rocks and the coolness of the background create a striking contrast. Enhance this by exaggerating the coolness in the background to push it further back, allowing the rocks and tree to stand out as the focal point.
Adjust Values for Depth
Adjust the values in your painting to reflect atmospheric perspective. In real life, distant objects appear lighter and cooler due to atmospheric veils. Ensure the background elements are lighter to create depth and separate them from the foreground.
Pro tipEnhance the contrast between warm and cool areas to make the focal elements stand out more strongly.
Embark on your painting journey by visualizing the overall composition of your scene. Begin with a simple and expressive design that captures the essence of Shelly Beach. Focus on creating a dynamic contrast between the warm foreground rocks and the cool background, using swishy diagonal lines to guide the viewer's eye and enhance depth. Simplify the background to allow the warm light and tree to stand out, setting the stage for a captivating focal point.
As you progress, pay close attention to the interplay of light and shadow. Analyze your photo references to decide which lighting elements to emphasize, adjusting values to reflect atmospheric perspective. Position the tree trunk against a lighter background for high contrast, and use dynamic lighting shapes to highlight your center of interest. Simplify the background further to ensure the tree's branches and foliage are the stars of the show.
Finally, bring your painting to life with vibrant colors and textures. Prepare your canvas with a warm base coat and sketch your composition lightly. Use bold, painterly strokes to paint the sky, headland, and beach, ensuring smooth transitions and soft edges. Capture the essence of the beach with textured brushwork and subtle reflections in the water. Let your creativity flow as you experiment with different models and perspectives, and embrace the organic development of your painting.
Points to remember
Contrast the warmth of the rocks against the coolness of the background for a dynamic composition.
Enhance the contrast between warm and cool areas to make the focal elements stand out more strongly.
Simplify the background to allow the tree's branches and foliage to stand out without competing for attention.
Ensure shadows fan out towards the sun, as this creates a realistic depiction of light and shadow.
Always lay out more paint than you think you'll need, as it's easier to return it to a jar than squeeze it back into a tube.
Sketch lightly with a pencil to prevent graphite from showing through the paint.
Use a lot of paint and keep it wet with a spray bottle for smooth transitions and soft edges.
Keep your palette wet to maintain the paint's workability, especially when blending large areas.