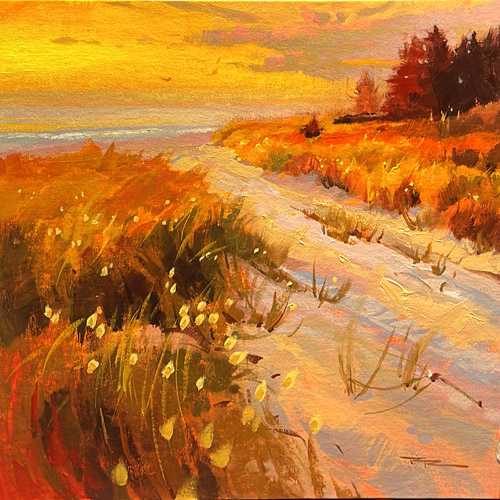
As the summer sun graces the beaches of New Zealand, I find myself exploring these serene landscapes in my camper van, capturing their beauty to share with you. One such gem is Rangiputa on the North Island, a place that inspired this lesson. Although I couldn't paint it live as the sun set, I captured stunning photos that we'll use to guide our painting journey. In this chapter, I'll show you how to transform a simple photo into a vibrant, glowing painting. We'll delve into the art of editing your photos right on your phone to enhance their warmth and color, setting the stage for a masterpiece. Whether you prefer acrylics or oils, I'll walk you through creating a radiant sky and adjusting your palette to suit the scene. Together, we'll simplify complex subjects into manageable steps, ensuring you enjoy the process without the fear of mistakes. By the end, you'll not only have a beautiful sunset beach painting but also the confidence to infuse any scene with that captivating inner glow.
This guide accompanies the full video lesson. The lesson includes the complete narrated video, the printable PDF chapter, and personalised critique support.
Rangiputa 15x15" Acrylic on Canvas by Richard Robinson
Step 3Applying the Undercoat
Apply the Undercoat
Start with an undercoat of arillamide yellow light. Wet your brush first and cover the entire canvas with this color. You can use any yellow or warm color like red or orange if preferred.
Add Orange to the Bottom
Mix Naphthol Red Light with some yellow to create an orange hue. Apply this to the bottom of the canvas while it's still wet for a smoother effect. Use the brush in various directions to avoid creating lines.
Soften with Red
Add a little more red to the orange area and soften it up using the tip of your brush. This technique will give a very smooth finish, especially with a big flat brush.
Let It Dry
Leave the undercoat to dry. Since it was painted thinly, it should take about 20 minutes to dry. This is one of the advantages of using acrylics.
Pro tipUse the brush in various directions to avoid creating lines and achieve a smooth finish.
Embark on your painting journey by carefully preparing your reference photo, enhancing its warmth and saturation to guide your artistic vision. As you move to canvas preparation, select a surface that complements your desired texture. Begin with a vibrant undercoat to establish the mood and set the stage for your composition.
With your composition sketched out, focus on building the scene from the sky downward, blending colors to capture the essence of light and atmosphere. Introduce clouds and trees with thoughtful color choices, ensuring each element harmonizes with the overall warm scheme. As you progress, pay attention to the interplay of warm and cool tones, especially in the sand and grass, to create depth and interest.
In the final stages, refine textures and add highlights to bring your scene to life. Use a variety of brush techniques to maintain a natural, gestural feel, and incorporate details like grass tips and bunny tails to enhance realism. Remember to keep your edges soft and your colors vibrant, allowing your painting to evoke the serene beauty of a walk to the beach.
Points to remember
Use the 'Copy Edits' feature to maintain consistency in your painting references.
Check the base material of your canvas board for desired texture.
Use the brush in various directions to avoid creating lines.
Ensure your path fans out from a single point perspective for natural flow.
Test your color mixes on a separate surface before applying them.
Use Ultramarine Blue for a warm color scheme.
Use a palette knife to add texture and create smooth transitions.
Use a dagger brush for long, beautiful lines when highlighting grass tips.